Last week, I looked at rendering 1-dimensional bar codes with Zxing and ColdFusion. The Zxing Java library creates a really flexible abstraction. Basically, it provides a bunch of “writers” that can encode different barcode formats into a “bit matrix” (a 2D representation of on/off pixels); and then, it provides a way to generically render that bit matrix into an image. As a follow-up post, I wanted to look at rendering QR Codes since this flavor of barcode has really become quite popular over the last few years (especially since the pandemic).
One of the really cool features of the QR code rendering is that it can absorb a certain degree of “error correction”. Which means, parts of the QR code can be obscured and the barcode scanner will still properly interpret the encoded data. The level of applied error correction determines how much of the QR code can be obscured without breaking the functionality. And, the greater the degree of error correction, the larger the QR code rendering has to be.
When you go to a restaurant and they provide a touch-free menu via a QR code; and, the restaurant has included its logo in the middle of the QR code; well, that’s not part of the QR code specification. They are just taking advantage of the error correction functionality. So as long as the branding / logo doesn’t obscure more than the error correction can account for, the QR code still works.
I had no idea this was how QR codes worked. So cool.
Just as with my previous Zxing and ColdFusion demo, I’m going to be using Lucee CFML’s ability to load Java classes from a set of JAR files:
	/**
	* I create a Java class from the given JAR files using an isolated classloader.
	*/
	private any function fromJars( required string classname ) {
		var jarPaths = [
			expandPath( "./vendor/com.google.zxing/3.5.3/core-3.5.3.jar" ),
			expandPath( "./vendor/com.google.zxing/3.5.3/javase-3.5.3.jar" )
		];
		return createObject( "java", classname, jarPaths );
	}
Ok, let’s start exploring.
Rending a QR Code With CSS Grid
As I mentioned above, Zxing works by providing a flexible abstraction that includes an intermediary data structure representation of the barcode pixels: BitMatrix. If we can access the location of the on/off pixels, we can use CSS Grid to render the QR code using nothing but HTML elements.
Note that I’m setting the error correction level to H, about 30%. This allows us to absolutely position a simulated logo in the center of the QR code rendering without breaking the QR code.
	include "./utils.cfm";

	// ------------------------------------------------------------------------------- //
	// ------------------------------------------------------------------------------- //

	ErrorCorrectionLevel = fromJars( "com.google.zxing.qrcode.decoder.ErrorCorrectionLevel" );
	EncodeHintType = fromJars( "com.google.zxing.EncodeHintType" );

	bitMatrix = fromJars( "com.google.zxing.qrcode.QRCodeWriter" ).encode(
		// Value we're encoding into the barcode / qr code.
		"https://www.youtube.com/watch?v=Aq5WXmQQooo",

		// Encoding settings.
		fromJars( "com.google.zxing.BarcodeFormat" ).QR_CODE,
		0, // Width (zero to use minimum size for rendered image).
		0, // Height (zero to use minimum size for rendered image).
		{
			// Error correction is the % of data that can be corrupted and still have the
			// QR-code be readable. Blows my mind that this is a thing!
			// --
			// H = ~30% correction
			// L = ~7% correction
			// M = ~15% correction
			// Q = ~25% correction
			"#EncodeHintType.ERROR_CORRECTION#": ErrorCorrectionLevel.H,
			// This is the size of the "quiet zone" around the barcode. The larger the
			// quiet zone, the easier it is to identify and scan.
			"#EncodeHintType.MARGIN#": 2
		}
	);

	// Since we passed-in zero as the width/height, the QR code writer will make the image
	// as small as possible. We can then inspect the bit-matrix to see what the dimensions
	// ended up being.
	barcodeWidth = bitMatrix.getWidth();
	barcodeHeight = bitMatrix.getHeight();


		QR Code Image: #barcodeWidth# x #barcodeHeight# pixels
Once we encode the URL value into the QR code, we get our two dimensional bit matrix. I’m then rendering that by using a nested loop:
- For Each Row
- For Each Column
- Render pixel with on/off background color.
- For Each Column
When we run this ColdFusion code, we get the following output:
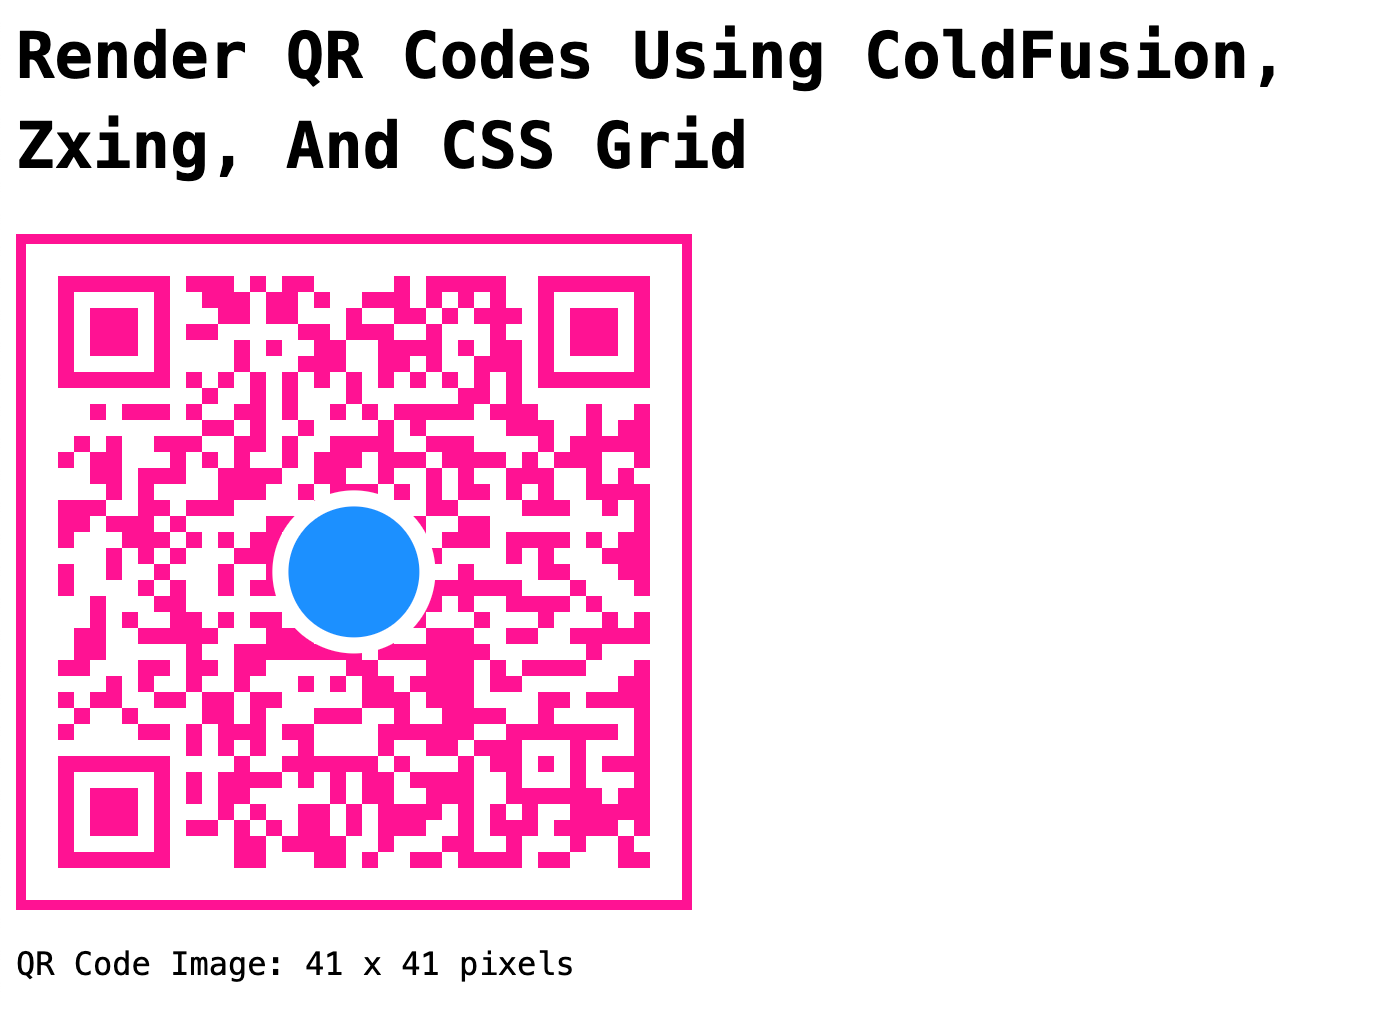
This works, but it creates a heavy Document Object Model (DOM). If our QR code is 41 x 41 px, that gives us a DOM tree size of at least 1,600 nodes. The larger our encoded value, the larger our QR code becomes. Just something to keep in mind.
That said, one nice thing about rendering the QR code via CSS grid is that we can scale up the image without any blurring. While the QR code, in this case, is natively 41 x 41, I’m rendering the CSS grid at about 340 pixels (due to the size of each grid cell).
Rending a QR Code With SVG
Another DOM-oriented strategy that scales well (visually) is SVG. Since we can access the 2-dimensional layout of pixels, we can use the same nested loop to translate that into SVG rectangles. Here’s the same demo, but with SVG instead of CSS grid.
When rendering to SVG, the important thing is to match the viewbox dimensions to the QR code bit matrix dimensions. This way, as the SVG scales-up, it doesn’t distort the underlying encoding.
	include "./utils.cfm";

	// ------------------------------------------------------------------------------- //
	// ------------------------------------------------------------------------------- //

	ErrorCorrectionLevel = fromJars( "com.google.zxing.qrcode.decoder.ErrorCorrectionLevel" );
	EncodeHintType = fromJars( "com.google.zxing.EncodeHintType" );

	bitMatrix = fromJars( "com.google.zxing.qrcode.QRCodeWriter" ).encode(
		// Value we're encoding into the barcode / qr code.
		"https://www.youtube.com/watch?v=Aq5WXmQQooo",

		// Encoding settings.
		fromJars( "com.google.zxing.BarcodeFormat" ).QR_CODE,
		0, // Width (zero to use minimum size for rendered image).
		0, // Height (zero to use minimum size for rendered image).
		{
			// Error correction is the % of data that can be corrupted and still have the
			// QR-code be readable. Blows my mind that this is a thing!
			// --
			// H = ~30% correction
			// L = ~7% correction
			// M = ~15% correction
			// Q = ~25% correction
			"#EncodeHintType.ERROR_CORRECTION#": ErrorCorrectionLevel.H,
			// This is the size of the "quiet zone" around the barcode. The larger the
			// quiet zone, the easier it is to identify and scan.
			"#EncodeHintType.MARGIN#": 2
		}
	);

	// Since we passed-in zero as the width/height, the QR code writer will make the image
	// as small as possible. We can then inspect the bit-matrix to see what the dimensions
	// ended up being.
	barcodeWidth = bitMatrix.getWidth();
	barcodeHeight = bitMatrix.getHeight();


		QR Code Image: #barcodeWidth# x #barcodeHeight# pixels
When we run this ColdFusion code, we get the following output:
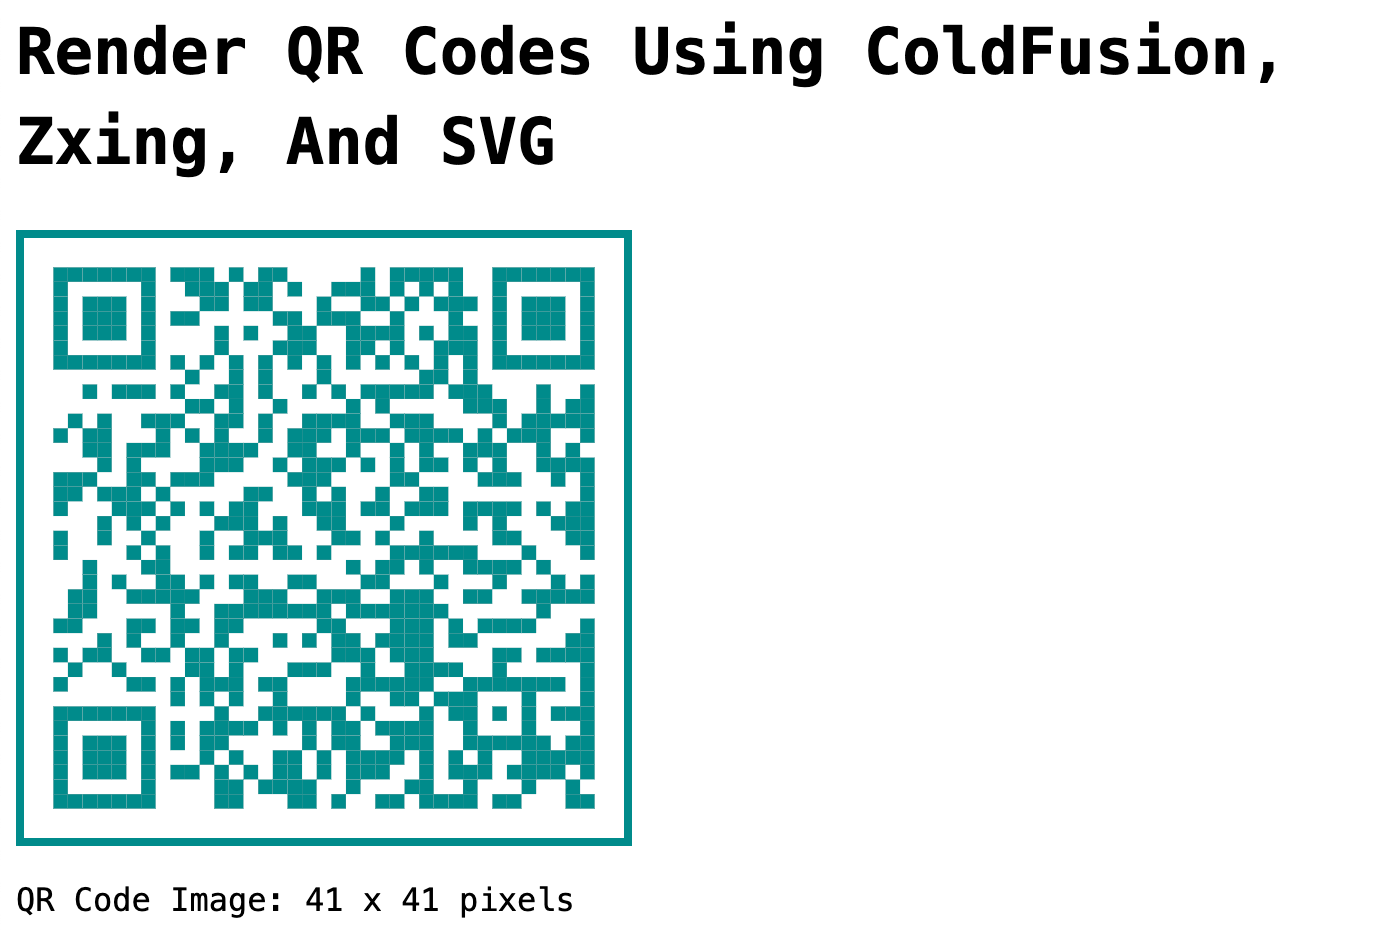
This, again, gives us a fairly heavy DOM. But, you could easily envision creating a ColdFusion end-point that serves just the SVG DOM; then, you could use that SVG end-point as an src attribute.
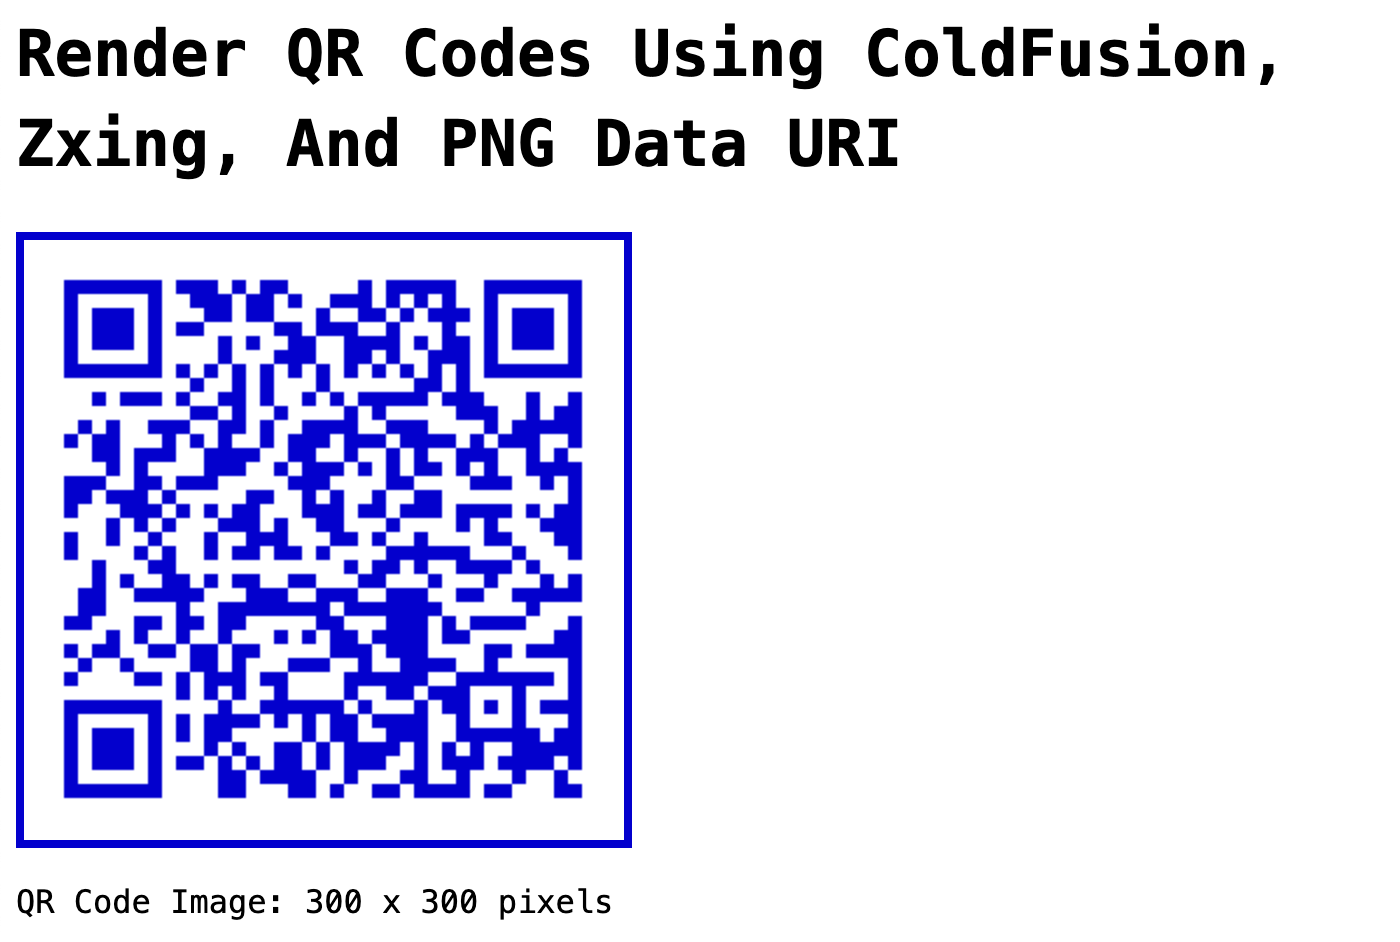
Rending a QR Code With a PNG Data URI
The Zxing provides the BitMatrix as an intermediary data format. It also provides a way to render that bit matrix to an image. This image can be written to a file, to a buffered image, or to an output stream. For the Data URI approach, rendering to an output stream is perfect. We can use a ByteArrayOutputStream and then encoded the resultant binary data as a Base64-encoded data URI.
To do this, I’ve created another utility method, matrixToBlob(). This method uses png by default and black/white for on/off pixels respectively.
	/**
	* I convert the given barcode BitMatrix into a blob / binary object that represents
	* the rendered image in the given format.
	*/
	private binary function matrixToBlob(
		required any bitMatrix,
		string onColorHex = "000000",
		string offColorHex = "ffffff",
		string imageType = "png"
		) {

		// The default configuration uses "black" for the "on" pixels and "white" for the
		// "off" pixels. We can override with colors of our choosing. The configuration
		// object models these colors as a single INT with each byte representing the
		// Alpha, Red, Green, and Blue channels, respectively. If a non-alpha color is
		// passed-in (6 hex digits), then let's assume a fully opaque color and prepend it
		// with the "ff".
		if ( onColorHex.len() < 8 ) {

			onColorHex = "ff#onColorHex#";

		}

		if ( offColorHex.len() < 8 ) {

			offColorHex = "ff#offColorHex#";

		}

		var imageWriter = fromJars( "com.google.zxing.client.j2se.MatrixToImageWriter" );
		var imageConfig = fromJars( "com.google.zxing.client.j2se.MatrixToImageConfig" ).init(
			inputBaseN( onColorHex, 16 ),
			inputBaseN( offColorHex, 16 )
		);
		var byteStream = createObject( "java", "java.io.ByteArrayOutputStream" ).init();

		imageWriter.writeToStream( bitMatrix, imageType, byteStream, imageConfig );

		return byteStream.toByteArray();

	}
Once we can convert the bit matrix into a blog, serializing it as an inline image becomes easy:
	include "./utils.cfm";

	// ------------------------------------------------------------------------------- //
	// ------------------------------------------------------------------------------- //

	ErrorCorrectionLevel = fromJars( "com.google.zxing.qrcode.decoder.ErrorCorrectionLevel" );
	EncodeHintType = fromJars( "com.google.zxing.EncodeHintType" );

	bitMatrix = fromJars( "com.google.zxing.qrcode.QRCodeWriter" ).encode(
		// Value we're encoding into the barcode / qr code.
		"https://www.youtube.com/watch?v=Aq5WXmQQooo",

		// Encoding settings.
		fromJars( "com.google.zxing.BarcodeFormat" ).QR_CODE,
		300, // Width.
		300, // Height.
		{
			// Error correction is the % of data that can be corrupted and still have the
			// QR-code be readable. Blows my mind that this is a thing!
			// --
			// H = ~30% correction
			// L = ~7% correction
			// M = ~15% correction
			// Q = ~25% correction
			"#EncodeHintType.ERROR_CORRECTION#": ErrorCorrectionLevel.H,
			// This is the size of the "quiet zone" around the barcode. The larger the
			// quiet zone, the easier it is to identify and scan.
			"#EncodeHintType.MARGIN#": 2
		}
	);

	// We passed-in the dimensions above; however, those are the "preferred" dimensions.
	// The image will be rendered larger if there's more data than will fit in the
	// preferred dimensions. As such, we need to double-check the image size.
	barcodeWidth = bitMatrix.getWidth();
	barcodeHeight = bitMatrix.getHeight();

	// Encode the PNG image data as base64 for our data URI.
	encodedImage = binaryEncode(
		matrixToBlob( bitMatrix, "0000cd" ), // Implicit PNG format.
		"base64"
	);


		QR Code Image: #barcodeWidth# x #barcodeHeight# pixels
This time, instead of dealing with the bit matrix directly, we’re having Zxing encode it as a PNG blob; and then we’re serializing that blob into a data URI. And, when we run this ColdFusion code, we get the following output:
Rending a QR Code With as a PNG With a Logo
As a final exploration, let’s create a PNG of our QR code complete with a (simulated) logo in the center. To do this, we’re going to take that PNG blob from above and use it as the source in an ImageNew() call. Then, we’ll render a rounded rectangle to the center of the image before drawing the image to the browser.
	include "./utils.cfm";

	// ------------------------------------------------------------------------------- //
	// ------------------------------------------------------------------------------- //

	ErrorCorrectionLevel = fromJars( "com.google.zxing.qrcode.decoder.ErrorCorrectionLevel" );
	EncodeHintType = fromJars( "com.google.zxing.EncodeHintType" );

	bitMatrix = fromJars( "com.google.zxing.qrcode.QRCodeWriter" ).encode(
		// Value we're encoding into the barcode / qr code.
		"https://www.youtube.com/watch?v=Aq5WXmQQooo",

		// Encoding settings.
		fromJars( "com.google.zxing.BarcodeFormat" ).QR_CODE,
		400, // Width.
		400, // Height.
		{
			// Error correction is the % of data that can be corrupted and still have the
			// QR-code be readable. Blows my mind that this is a thing!
			// --
			// H = ~30% correction
			// L = ~7% correction
			// M = ~15% correction
			// Q = ~25% correction
			"#EncodeHintType.ERROR_CORRECTION#": ErrorCorrectionLevel.H,
			// This is the size of the "quiet zone" around the barcode. The larger the
			// quiet zone, the easier it is to identify and scan.
			"#EncodeHintType.MARGIN#": 2
		}
	);

	// We passed-in the dimensions above; however, those are the "preferred" dimensions.
	// The image will be rendered larger if there's more data than will fit within the
	// preferred dimensions. As such, we need to double-check the image size.
	barcodeWidth = bitMatrix.getWidth();
	barcodeHeight = bitMatrix.getHeight();

	// The matrix-to-image writer can output a BufferedImage. However, it seems that if we
	// use said buffered image as the ImageNew() source, it corrupts the underlying image
	// data in some way (that I don't understand). So, instead, we're going to convert the
	// BitMatrix to an image Blob and then use that as the source.
	image = imageNew(
		matrixToBlob( bitMatrix, "0000cd" ),
		"", // Dimensions are undefined when providing a source.
		"", // Dimensions are undefined when providing a source.
		"rgb", // Color model.
		"ffffff" // Background canvas color.
	);

	// QR code logos work by leveraging the error-correction functionality of the image
	// rendering. By using the "H" level error-correction above, it means that we can
	// obscure ~ 30% of the QR code and it will still be functional (mind blown!). So, as
	// long as our logo image doesn't cover more than this amount, it should be fine. For
	// this demo, we're going to simulate the logo with a rounded rectangle.
	rectWidth = 120;
	rectHeight = 120;
	rectX = fix( ( barcodeWidth / 2 ) - ( rectWidth / 2 ) );
	rectY = fix( ( barcodeHeight / 2 ) - ( rectHeight / 2 ) );

	image.setAntialiasing( true );
	image.setDrawingColor( "##c000ff" );
	image.drawRoundRect( rectX, rectY, rectWidth, rectHeight, 200, 200, true );


		QR Code Image: #barcodeWidth# x #barcodeHeight# pixels
Again, we’re using the matrixToBlob() to convert the Zxing BitMatrix into a binary value that represents the PNG rendering of the QR code. We could have written this binary to the file-system; but, instead we’re using ColdFusion’s writeToBrowser action to render it as a temporary file.
And, when we run this ColdFusion code, we get the following output:
As you can see, the logo in the center can be quite large (when we have the error correction jacked up to 30%) and the QR code still works. In this exploration, I’m hard-coding the size of the logo. But, if you know which error correction level you are using, you could, in theory, scale the logo up-or-down to ensure that you don’t cross the given obscuring threshold.
Epilogue on Rendering to a Buffered Image
In this blog post, I’ve been rendering the BitMatrix to an output stream / binary object. You can also render the BitMatrix to a buffered image. This is alluring because ColdFusion’s ImageNew() call can use a buffered image as the source. However, thar be dragons.
In my experience (specifically tested with Lucee CFML), using the buffered image as the source creates problems. It seems to prevent the color space from working as expected. And, in some workflows, it seemed to completely prevent me from writing to the ColdFusion image object after it was initialized.
All of these problems go away when I started rendering to a blob (instead of a buffered image) and then use the blob as the ImageNew() source. I’m not sure if this is how Adobe ColdFusion would work; or, if this is something specific to Lucee’s implementation of the image functions.
Want to use code from this post?
Check out the license.
https://bennadel.com/4808
Source link